Tuesday, January 13, 2015

Japanese Pan Noodles -- posted by Jessica


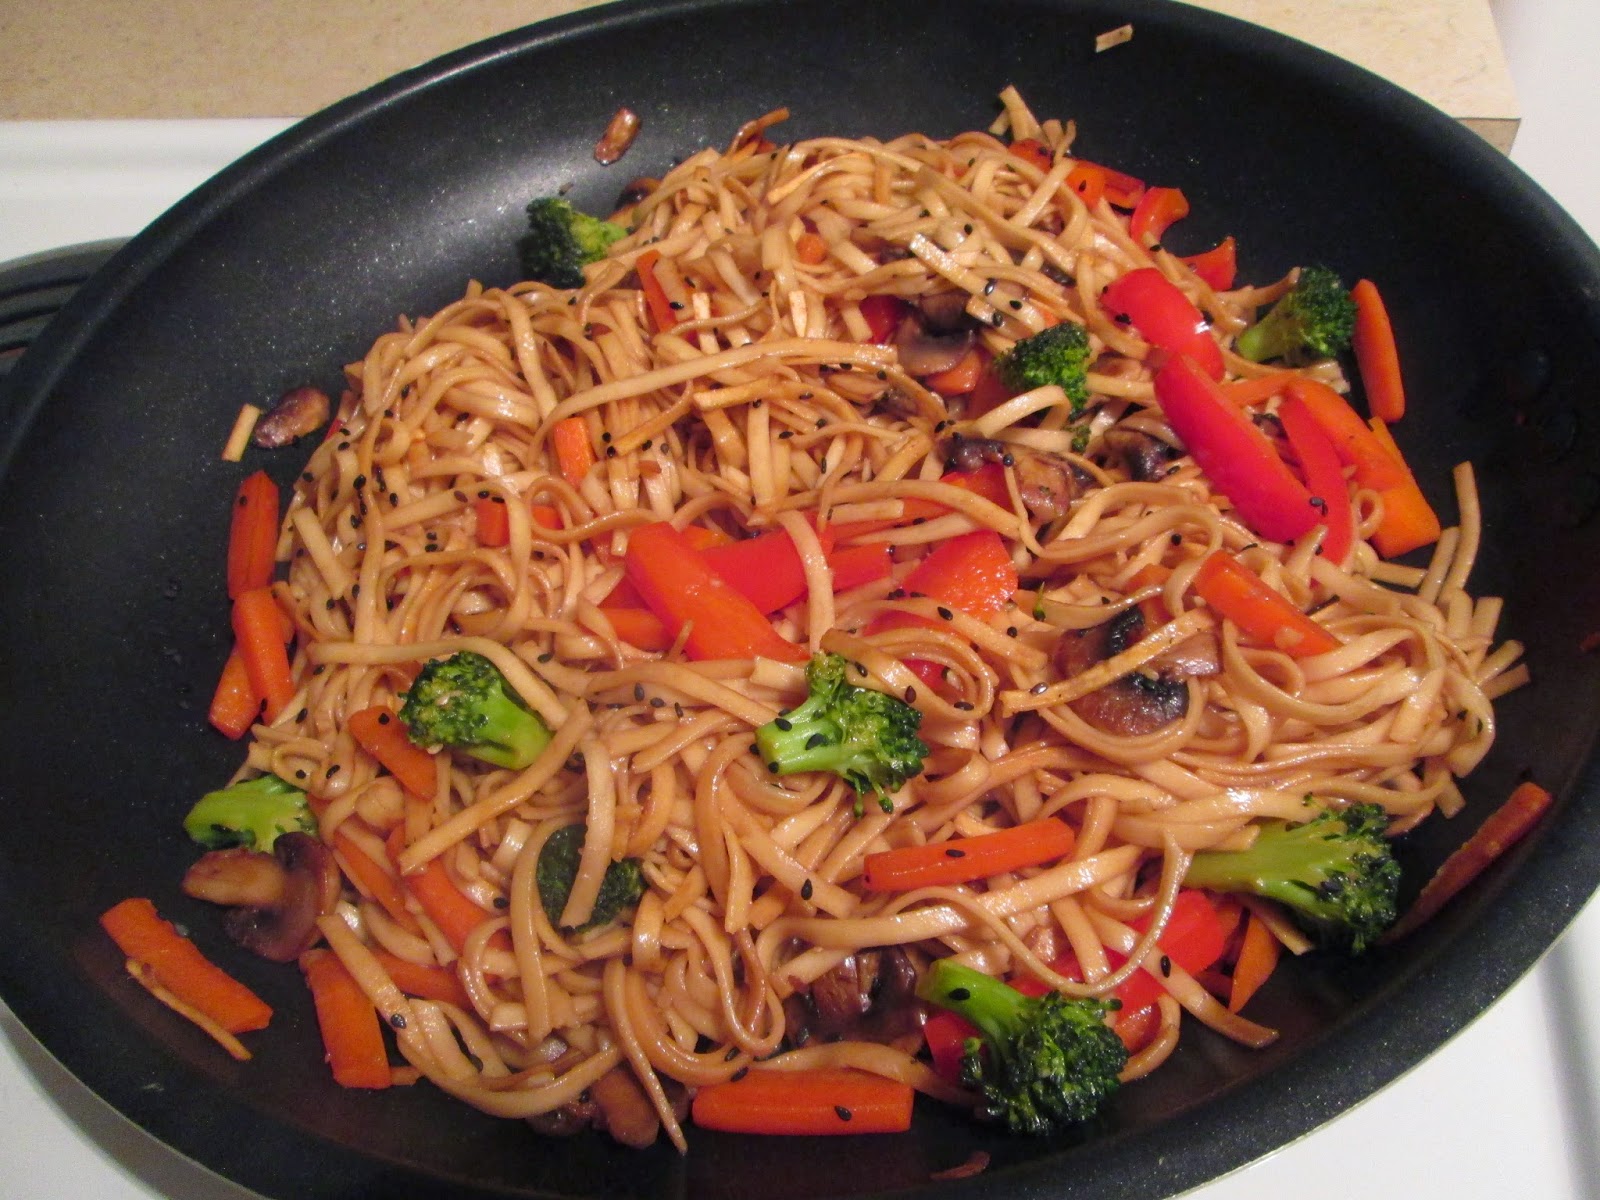
I love the Japanese Pan Noodles at Noodles and Co. and have been wanting to try to make them at home for a long time, so I searched online and found several copycat recipes. I decided on one I found on Hobbyfarms.com. I cut the recipe in half just in case I ended up not liking it. It turned out pretty good, but next time will use some more veggies, especially if going vegetarian like I did this time. Also, the sesame oil is very strong, so next time I will just use a small amount of it to flavor the noodles along with a bit of veg oil to keep them from sticking. The full amount of the sesame oil was a bit over-powering.

I was not able to get the noodles to caramelize much; maybe using the thick round fresh noodles like they have at Noodles and Co. would help along with a bit more of the sweet soy (I used black soy sauce; I am thinking that are the same as it has molasses in it). I had dried udon noodles that I boiled for about 4 minutes and they are more flat - like pad thai noodles. Next time, I will try to find the thick round noodles. I did not have any mirin so I used rice vinegar and also did not have chili garlic sauce so I used red chili flakes and a bit of hot sauce to taste. Next time, I will make sure to get a bottle of the chili garlic sauce and try it with that
Overall, it is a good starting point to experiment with and try to get a bit closer to Noodles & Co.'s

Here is the recipe as printed from the site listed above:


Japanese Pan-fried Noodles
Yield: 6 servings
Ingredients
  • 1 pound Japanese soba or udon noodles
  • 1 T. sesame oil
  • 1 cup broccoli florets
  • 1 cup julienne-cut carrots, julienne
  • 1 T. canola oil
  • 1/2 cup fresh shiitake mushrooms, stems removed and sliced (optional)
  • 1 cup julienne-cut peppers, julienne
  • 1 T. minced fresh ginger
  • 2 cloves, garlic, minced
  • 2 T. mirin
  • 3 T. sweet soy sauce
  • 1 T. chili-garlic sauce
  • 3 T. fresh cilantro (optional)
  • 1 tsp. black sesame seeds (optional)
Preparation
Cook soba or udon noodles in boiling water until al dente, following package cooking instructions (usually about 4 minutes). Drain cooked noodles and place in cold water. Drain noodles again, toss lightly with sesame oil, and let sit while preparing vegetables.
Briefly blanch broccoli and carrots in steamer or boiling water, then set aside. If using defrosted broccoli, skip this step for broccoli.
In large sauté pan or wok over medium to high heat, add canola oil and sauté shiitake mushrooms until lightly browned.
To hot sauté pan or wok, add carrots, broccoli, peppers, ginger, garlic, mirin, sweet soy sauce and chil-garlic sauce to stir-fry, mixing frequently. After three to four minutes, add noodles and pan-fry until caramelized and mixed well with vegetables.
Serve in individual bowls and sprinkle with cilantro and black sesame seeds.

Monday, January 12, 2015

Butternut Squash Lasagna -- posted by Jessica


I made this lasagna last year and forgot to post it. I had intentions to make a new lasagna every month last year and ended up only making two (3 if you count the one I made for Christmas Eve a few weeks ago, but I had made that one a previous year). I will try and get that recipe posted as well as the Spinach Artichoke lasagna I made last year. Maybe, this year I can get through some of the other ones on my list from last year! There are just so many different and unique ones to choose from!

I saw this one on a cooking show Giada De Laurentiss on the Food Network and it looked so good I decided I should try it. I love butternut squash ravioli so I figured it would be good in lasagna form!

I used a bag of frozen butternut squash to save time (around a 16 oz. bag I think). Also, just used low fat milk as that is what I had on hand.

It turned out pretty good; it was on the sweet side. I think next time, I will add a layer of sautéed mushrooms and maybe some shredded chicken to give it a bit more layers and texture. And maybe a layer of ricotta (that is my favorite part in a traditional lasagna!)  But, otherwise, I really enjoyed it and the leftovers froze really well.

Here is the recipe from the food network website:

Ingredients
  • 1 tablespoon olive oil
  • 1 (1 1/2 to 2-pound) butternut squash, peeled, seeded, and cut into 1-inch cubes
  • Salt and freshly ground black pepper
  • 1/2 cup water
  • 3 amaretti cookies, crumbled
  • 1/4 cup butter
  • 1/4 cup all-purpose flour
  • 3 1/2 cups whole milk
  • Pinch nutmeg
  • 3/4 cup (lightly packed) fresh basil leaves
  • 12 no-boil lasagna noodles
  • 2 1/2 cups shredded whole-milk mozzarella cheese
  • 1/3 cup grated Parmesan
 
Directions
Heat the oil in a heavy large skillet over medium-high heat. Add the squash and toss to coat. Sprinkle with salt and pepper. Pour the water into the skillet and then cover and simmer over medium heat until the squash is tender, stirring occasionally, about 20 minutes. Cool slightly and then transfer the squash to a food processor. Add the amaretti cookies and blend until smooth. Season the squash puree, to taste, with more salt and pepper.
Melt the butter in a heavy medium-size saucepan over medium heat. Add the flour and whisk for 1 minute. Gradually whisk in the milk. Bring to a boil over medium-high heat. Reduce the heat to medium and simmer until the sauce thickens slightly, whisking often, about 5 minutes. Whisk in the nutmeg. Cool slightly. Transfer half of the sauce to a blender*. Add the basil and blend until smooth. Return the basil sauce to the sauce in the pan and stir to blend. Season the sauce with salt and pepper, to taste.
Position the rack in the center of the oven and preheat to 375 degrees F.
Lightly butter a 13 by 9 by 2-inch glass baking dish. Spread 3/4 cup of the sauce over the prepared baking dish. Arrange 3 lasagna noodles on the bottom of the pan. Spread 1/3 of the squash puree over the noodles. Sprinkle with 1/2 cup of mozzarella cheese. Drizzle 1/2 cup of sauce over the noodles. Repeat layering 3 more times.
Tightly cover the baking dish with foil and bake the lasagna for 40 minutes. Sprinkle the remaining mozzarella and Parmesan cheeses over the lasagna. Continue baking uncovered until the sauce bubbles and the top is golden, 15 minutes longer. Let the lasagna stand for 15 minutes before serving.

Pumpkin Dutch Apple Pie -- posted by Jessica


This was my pie for Thanksgiving and it was super good! Definitely will make it again! I had a regular pie crust in my freezer, so I used that, but ended up having too much pumpkin filling so I had to back a couple of mini 'pumpkin puddings' I will make sure to use a deep dish pie crust next time!
I found this recipe somewhere online just searching for different pie recipes when I was thinking about what to make for Thanksgiving. I came across this one and thought the two pies in one was brilliant plus I love Biscoff  cookies so I decided to give it a go.
I'm glad I did! So good, especially with a bit of whip cream on top!

Pumpkin Dutch Apple Pie

1 store-bought deep dish pie crust or pie dough, fitted in a deep dish pie plate

For Apple Layer:
  • 2 cups peeled, cored and thinly sliced Granny Smith apples
  • ¼ cup sugar
  • 2 tablespoons flour
  • 1 teaspoon lemon juice
  • ¼ teaspoon cinnamon (I used a bit more; I LOVE cinnamon!)
For Pumpkin Layer:
  • 1 ½ cups pumpkin puree (not pumpkin pie filling)
  • 1 cup evaporated milk (not condensed milk)
  • ½ cup sugar (I used a bit less; about a 1/3 c or so)
  • 2 eggs
  • 2 tablespoons butter, melted
  • 1 teaspoon vanilla extract (I used vanilla bean paste)
  • ¾ teaspoons cinnamon
  • ⅛ teaspoon nutmeg
  • ¼ teaspoon salt
For Crumble Topping:
  • ½ cup all purpose flour
  • ⅓ cup walnuts, chopped (I used pecans)
  • 5 tablespoons brown sugar
  • 6 speculoos (spiced Belgian cookies  = Biscoff cookies), crumbled
  • 3 tablespoons butter, melted
Instructions:
  1. Preheat oven to 350 degrees. Place pie crust on a foil-lined baking sheet.
  2. In a large bowl, toss together apples, sugar, flour, lemon juice and cinnamon. Pour into the UNBAKED pie crust and arrange into an even layer.
  3. In another bowl, whisk together pumpkin, evaporated milk, sugar, eggs, butter, cinnamon, nutmeg and salt until well combined. Pour evenly over apple layer.
  4. Bake for about 30-35 minutes or until just starting to set.
  5. Meanwhile, in a medium bowl, combine flour, walnuts, brown sugar, crushed cookies and butter until it forms a mixture that resembles wet sand. Set aside.
  6. Remove pie from oven and top with crumble. Bake for another 20-23 minutes or until the pumpkin layer is set and the crumble begins to turn golden.
  7. Cool for about 30 minutes before cutting for best results.

Spicy Squash Satay -- posted by Jessica

I saw this recipe on the Sorted Food youtube channel last week and it sounded interesting. I had a butternut squash sitting on my counter for awhile now begging to be used so I decided to give this one a try. At first taste, I wasn't sure about it. It was okay, but not great. I added some fish sauce and a bit more hot sauce and chili flakes to spice it up a bit then stuck the leftovers in the fridge.

Now that I have tried the leftovers, the flavors have melded much better and I really like it! Good thing, as it made a lot and I have several containers of it in my freezer for future meals!

It was a bit of a project cutting up the squash (I used the microwave to soften up the tough skin of the squash first before cutting it) and making the cashew butter. I have made cashew butter before and they do not turn into butter very easy! But I had cashews in the freezer to use up and store bought cashew butter is so expensive, so I made a tiny batch of my own. It was just enough for this recipe.

I did change up a few things according to what I had on hand - used a couple shallots and some diced onion from the freezer for the red onion. I did not use the red chili; I put in some hot sauce and some dried chili flakes to taste. I did not use beansprouts; I used three stalks of sliced bokchoy instead. I added the sliced stalks in with the green beans (frozen from the summer garden bounty), cooked for a couple minutes and then added the sliced bokchoy leave in with some chopped basil. I used basil instead of cilantro. I used honey instead of rice syrup and used chicken stock powder for the veg stock.


Here is the Sorted Food recipe:

INGREDIENTS
    Veg Base
    • 1 red onion
    • 2 cloves of garlic
    • 1 knob of fresh ginger
    • 1 red chilli
    • 1 butternut squash
    • 2 shots of vegetable oil
    • 1 handful of green beans
    • 200 g beansprouts
    • 50 g cashew nuts
    Satay Base
    • 4 tbsp cashew nut butter
    • 2 tbsp rice syrup (or honey)
    • 4 tbsp soy sauce
    • 750 ml veg stock

    Peel and dice the onion, garlic, ginger and chilli so they are fairly small. Fry them all in a large saucepan with the 2 shots of veg oil over a low-medium heat for 5 minutes until the onions are soft.

    Peel and cube the squash into bite-sized pieces. Toss the squash into the pan, turn up the heat a little and continue to fry for another 5 minutes.
     
    Spoon in all of the ingredients for the satay sauce, including the stock and heat the mixture to a bubble. Simmer for 20 minutes until the squash is just soft.
     
    Top and tail the washed green beans and cut them all in half. Throw the prepared beans into the pan and simmer for a further 2 minutes before stirring in the beansprouts and a generous amount of chopped coriander.
     
     
    Toast off a handful of cashews in a dry pan and serve the spicy vegetable satay with a scattering of warm nuts and rice noodles on the side.


Tuesday, January 6, 2015

Red Beans and Rice...just what the arctic temperatures called for!

So, last summer I was into charcoal grilling chicken with my own maple bbq sauce... fabulous!! One night I cut the meat off the bones so it would cook faster. Once it was done, I tossed the bones back on the grill and left them until the grill was cool. The result was charred meat and smoked bones, which I then threw into a stock pot with some veggies and simmered for 12 hours or so. I've been waiting for the motivation and opportunity to try out the smoked chicken stock, and thought that it would go well with some kind of Cajun cuisine. Using the recipe below as my base, I made red beans and rice for the first (but definitely not last!) time in my life. My modifications are as follows (also marked with * on the recipe):

I didn't have dried red beans, but I did have an old 2 lb can of red beans...I used them un-rinsed

I also added about half a cup of crushed tomatoes and green chilies from the freezer

I cut the cayenne pepper down to a sprinkle...1/8 tsp or less (it was plenty!) 

I crushed up maybe 1/2 cup of dehydrated kale and added that as well.

I cooked the veggies in olive oil and then added them and the canned beans to the smoky broth and brought it to a boil. Then I added the sausage and transferred it to a crock pot where I let it sit for an hour or so on low. Once it was totally warmed through (and delicious), I threw in 2 cups or so of uncooked rice and let it sit for however many hours it took for the rice to absorb all the water and be tender...not sure how long because at that point I went to bed :-) When I woke up and saw that it was done, I turned the crock pot off and let it cool for the rest of the night. It made TONS...and it is wonderful!

Authentic Louisiana Red Beans and Rice
 
recipe image
Rated:rating
Submitted By: MIAMI BEACH
Photo By: Caroline C
Prep Time: 25 Minutes
Cook Time: 3 Hours 5 Minutes
Ready In: 11 Hours 30 Minutes
Servings: 8
"I grew up in Louisiana and love red beans and rice, these are just like I remember - red beans made with Cajun seasonings and andouille sausage. This is a great Sunday supper."
INGREDIENTS:
1 pound dry kidney beans *I used 2lb canned beans un-rinsed
1/4 cup olive oil *or however much needed
1 large onion, chopped
1 green bell pepper, chopped
2 tablespoons minced garlic
2 stalks celery, chopped
6 cups water *I used the smoky broth
2 bay leaves
1/2 teaspoon cayenne pepper *seriously, just, no! a sprinkle will do!! :-)
1 teaspoon dried thyme
1/4 teaspoon dried sage
1 tablespoon dried parsley
1 teaspoon Cajun seasoning
1 pound andouille sausage, sliced
4 cups water *since I threw the rice right into the broth I omitted this
2 cups long grain white rice
DIRECTIONS:
1.Rinse beans, and then soak in a large pot of water overnight.
2.In a skillet, heat oil over medium heat. Cook onion, bell pepper, garlic, and celery in olive oil for 3 to 4 minutes.
3.Rinse beans, and transfer to a large pot with 6 cups water. Stir cooked vegetables into beans. Season with bay leaves, cayenne pepper, thyme, sage, parsley, and Cajun seasoning. Bring to a boil, and then reduce heat to medium-low. Simmer for 2 1/2 hours.
4.Stir sausage into beans, and continue to simmer for 30 minutes.
5.Meanwhile, prepare the rice. In a saucepan, bring water and rice to a boil. Reduce heat, cover, and simmer for 20 minutes. Serve beans over steamed white rice.
ALL RIGHTS RESERVED © 2015 Allrecipes.comPrinted from Allrecipes.com 1/6/2015

Sunday, February 9, 2014

Gingerbread Men Cookies -- posted by Jessica

Well, yet again, I had a holiday pudding mix to use up! Gingerbread flavor this time! I found a recipe on the Jello site for gingerbread people cookies the called for butterscotch pudding mix. I just subbed in the gingerbread one instead and cut back on the spices slightly.
I did find this dough to be a bit crumby and hard to work with. Next time, I would add an egg white to the mix and see if that helped hold the dough together. A lot of the reviews on the Jello site commented on how soft these cookies were, however, mine turned out crispy. But they were still really good and cute! I had not really attempted homemade roll out cookies before, so I think they turned out pretty well for my first try.

Gingerbread Men Cookies

3/4 cup butter softened
3/4 cup brown sugar
1 box (4 serving size) butterscotch OR gingerbread instant pudding mix
1 egg
2 cups flour
1 tsp baking soda
1 Tb ground ginger
1 1/2 tsp cinnamon

Beat first 4 ingredients. Combine the rest of the ingredient and gradually add to the butter mixture. Chill 1 hour or until firm. Roll dough to 1/4 inch thick on lightly floured surface. Cut with gingerbread man cookie cutter and placed 2 inches apart on a greased (or parchment lined) baking sheet. Press on raisins or sprinkles for eyes and buttons if desired. Bake at 350 10 to 12 minutes or until edges are lightly browned. Cool 3 minutes then remove to wire rack to cool completely.
Yield: 20 cookies. (I actually got about 2 1/2 dozen. I think my cookie cutter was on the small size)

Candy Cane Pudding Cookies -- posted by Jessica

I think these cookies are some of the best Christmas cookies I have ever baked, and I've baked a ton of different cookies over the years! I had a box of Jello instant pudding mix - candy cane flavor - left over from last Christmas that needed to be used. I wanted to try something different with it rather than just making pudding (although it does make good pudding with a pretty pink color (from all the red 40, I know, I know! LOL) What-ev.
Anyhoo, I found a recipe online for pudding cookies and decided to use that recipe with a few changes. I had a couple of candy canes so I crushed those up on my mini chopper and stirred those into the cookie dough for some extra peppermint punch! These cookies turned out moist and delicious! Very holiday-ish! And so soft and chewy; my favorite kind of cookie!

Candy Cane Pudding Cookies

1/2 cup butter softened
1/4 cup plain yogurt (I did not have any yogurt at the time, so I used 1 Tb vegetable oil)
3/4 cup brown sugar (I used 2/3 cup since the pudding mix is already quite sweet)
1/4 cup white sugar (I used 2 Tb)
1 tsp vanilla
2 eggs
1 box (4 serving size) candy cane pudding mix
1/4 tsp salt
1 tsp baking soda
2 1/4 c. flour
2 crushed candy canes

Cream the butter, oil and sugars. Beat in the eggs and vanilla. Combine the pudding mix, salt, soda and flour. Gradually beat or stir into the creamed mixture. Stir in the crushed candy canes. Drop by tablespoonfuls onto parchment lined baking pans and bake at 350 for 9-10 minutes. Cool for about a minute to set them up a bit then remove to a cooling rack. They soften a bit once they have been put into containers, so layer them with sheets of parchment or wax paper to prevent them from sticking to each other.  I got about 2 1/2 dozen.